Index
- Generate a SIF file
- Upload a SIF file
- Track SIF file status
- Create RFR file
- Track RFR file status
- Review of RFR and SIF by Checker
- Manage Employee Information
- Upload NON WPS File
- Upload GPSSA Pension File
- Card Request
- Set password question/Change Password
- Forced Change Password
- Maker & Checker
- RFR File Format
- SIF File Format
- The Wage Protection System
- View Annotated NACK Report
Generate a SIF file
- Go to Employer home " PAYROLL SYSTEM" screen
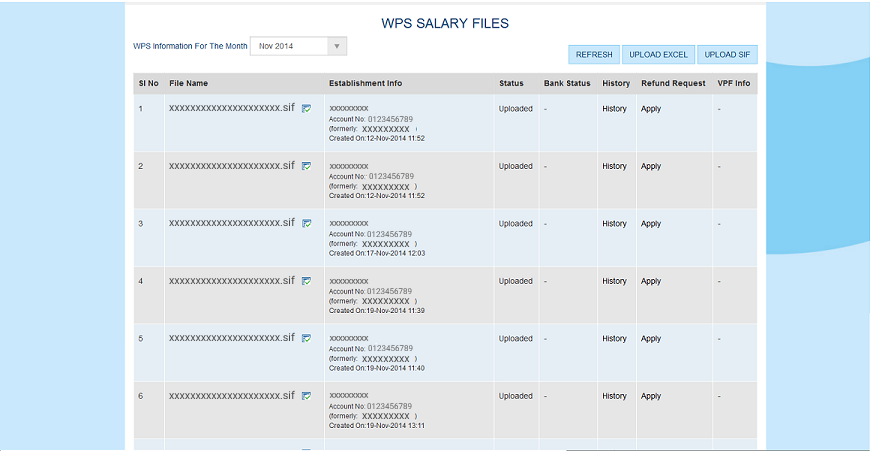
- Click on the WPS SALARY FILES link
- Select a month in the drop down, so that WPS information for the month will be displayed
- All the SIF files uploaded for the selected month with file details, status, bank status and history will be displayed

- To generate a SIF file, click on the EXCEL button, so that EXCEL FILE UPLOAD screen will be displayed
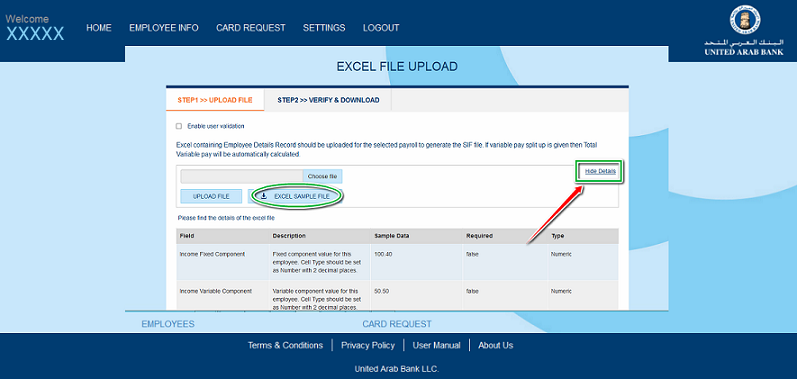
- Employer can ‘download a sample excel file’ using ‘ EXCEL SAMPLE FILE’button or use the formated xls to upload
- To hide the guideline on attributes in Excel sheet, click on the the hyper link 'Hide Details'
- To click on the show details link to get info on required fields, data and data type
- Select the xls file and click on UPLOAD FILE button so that a mapping screen will be displayed
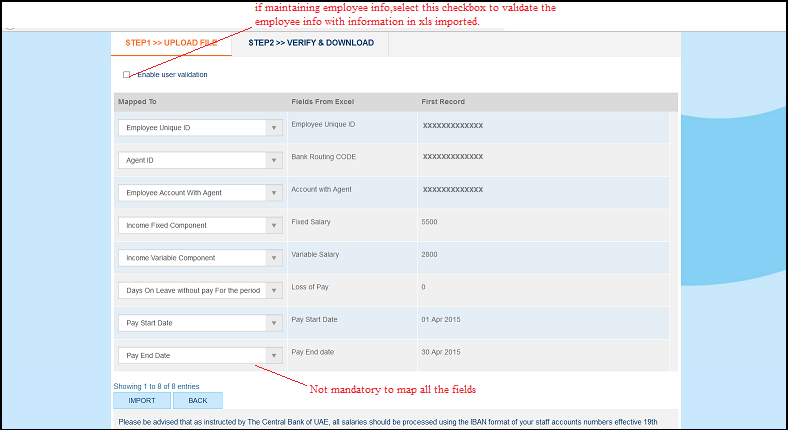
- Maping is not mandatory for all the fields as shown in the figure
- In case if the mapping is not complete, system will prompt to map the fields
- Click on IMPORT button and on successful completion of data upload, system will give a message “Data imported successfully” with number of employees, Total fixed salary and Total variable salary
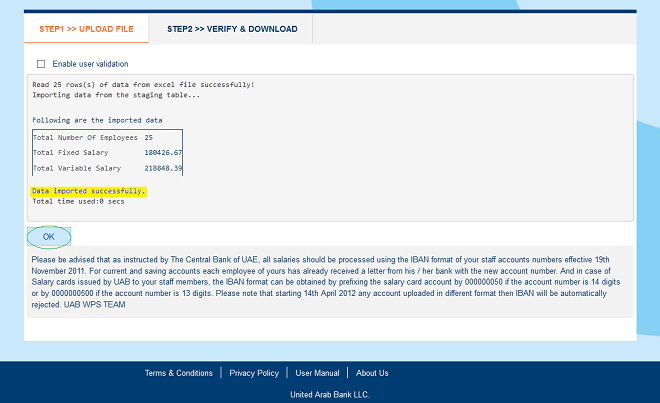
- Next step is verification and down load of data to WPS. To perform this click on the OK button and
- User will be redirected to the screen below
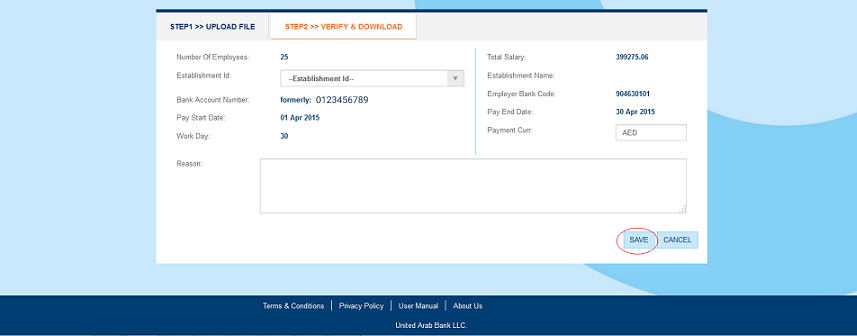
- Employer can modify the establishment ID by editing the uploaded information and click on SAVE button
- Once this is done, click on SEND FOR APPROVAL button to forward the SIF file to Employer (Checker)
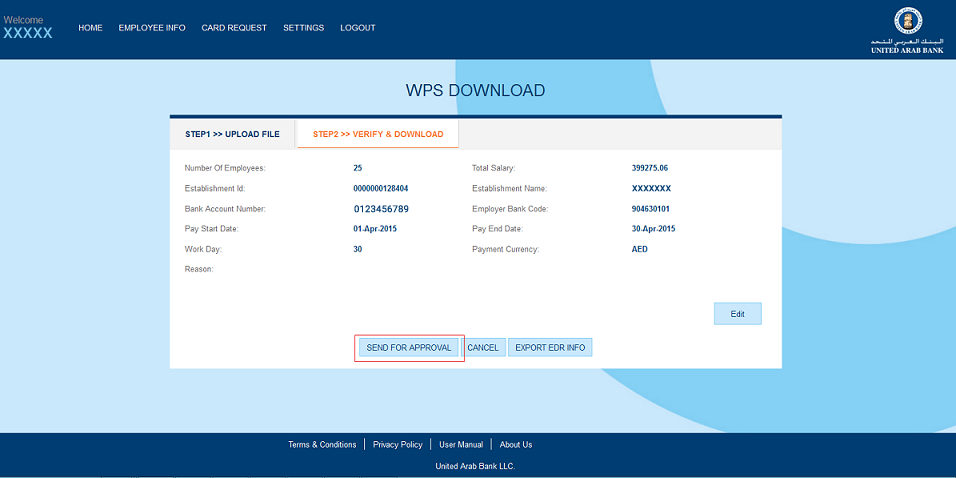
- To export the SIF file information in Excel format, click on the EXPORT EDR INFO button
Upload a SIF file
- Go to Employer home screen
- Select a month in the dropdown, so that WPS information for the selected month will be displayed
- All the SIF files uploaded for the selected month with file details, status, bank status and history will be displayed
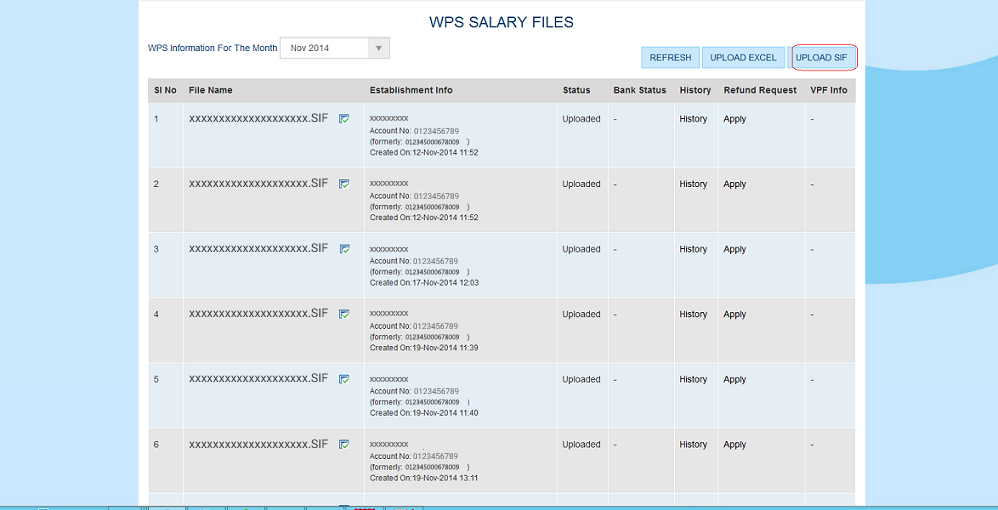
- To upload a SIF file,click on the UPLOAD SIF button, so that SIF file upload screen will be displayed
- Browse and select the SIF file and click on UPLOAD FILE button
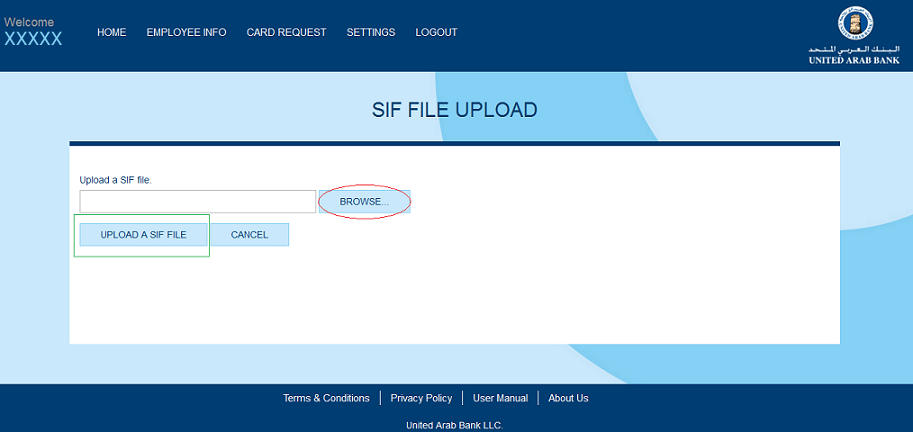
- System will show a message on account of success/failure of the SIF upload

Track SIF file status
- All the SIF files uploaded with file details, status, bank status and history will be displayed for the selected month at Employer Home
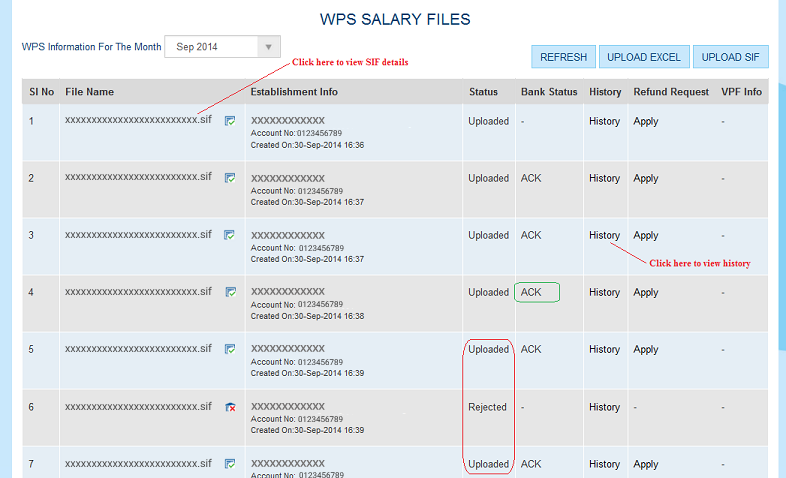
- SIF file Name, Establishment Info, Status, Bank Status, History, whether Refund Request has been raised etc will be displayed
- ‘Prepared’ status will be displayed for all the successful SIF uploads by Employer(Maker)
- ‘Approved status’ will be displayed for SIF files approved by Employer (Checker)
- ‘Rejected status’ will be displayed for SIF files rejected by Employer (Checker)
- ‘Uploaded’ status will be displayed for all the successful SIF uploads
- ‘Uploaded-Bank Status’ will be displayed for all the pending SIF files with the Customer Bank
- ‘RAW-Bank Status’ will be displayed for all the pending SIF files with the Central Bank
- ‘ACK-Bank Status’ will be displayed for all the approved SIF files by the Central Bank
- ‘NACK-Bank Status’ will be displayed for all the pending SIF files by the Central Bank
- To view the details in the SIF file, click on the hyper link enabled for the respective SIF file name
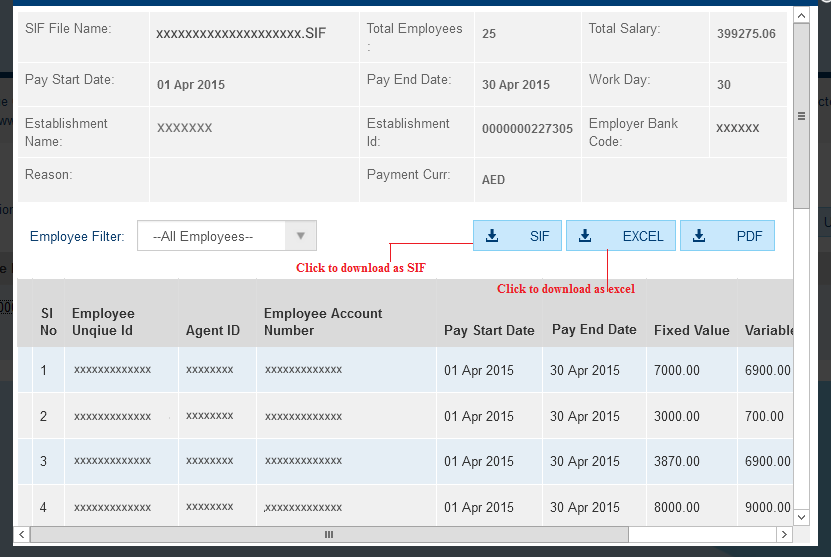
- To download SIF, click on the the button 'SIF'
- To download the SIFdetails in Excel format, click on the button 'EXCEL'
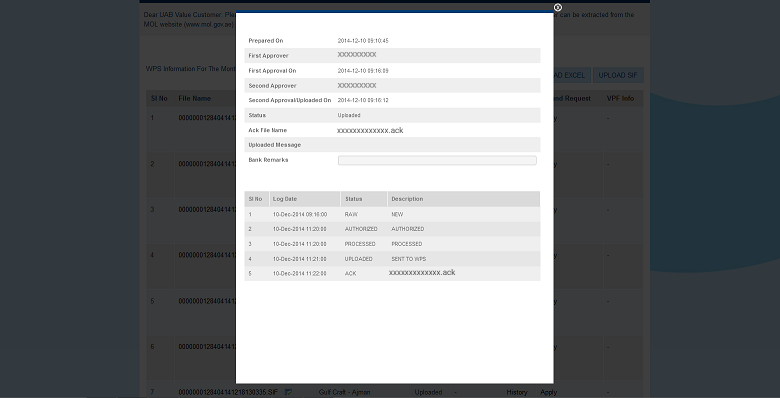
- To view the entire file history, click on the hyper link enabled for ‘history’ under History column
Create RFR file
On account of error in arriving at the salary amount, omission in terms of deductions or pay-out on behalf of another bank account, sometimes Employer may require a provision to request for refunding the salary for one or more employees
- Employer can create a Refund Request on behalf of employees for a SIF file uploaded with Bank Status ACK
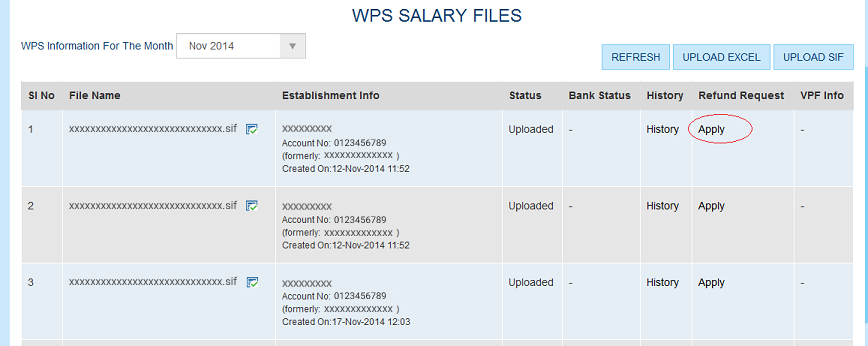
- Click on the Apply button shown against the SIF file, so that RFR refund screen will be displayed
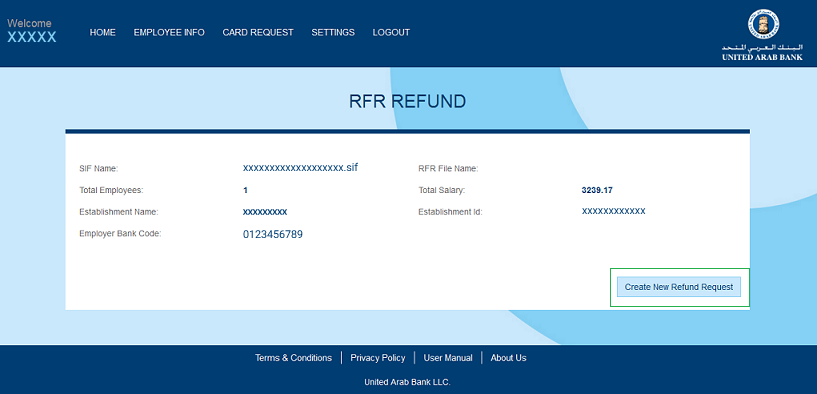
- Click on the Create New Refund Request button shown against the SIF file, so that RFR refund screen will be displayed
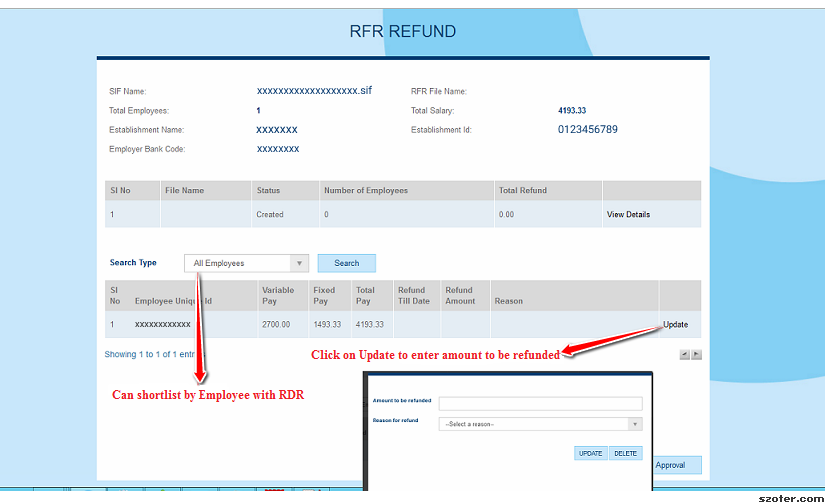
- Employer can short list and view the Employees with RDR
- Click on UPDATE button against Employee for whom Refund is sought for
- Enter Amount to be refunded and reason for refund and SAVE
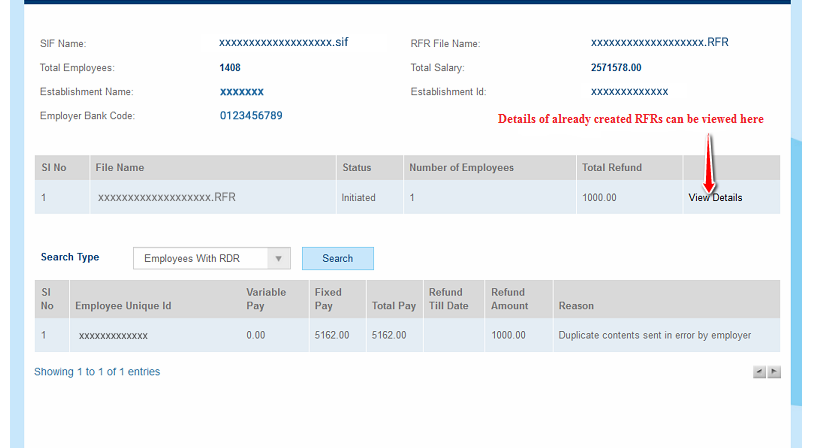
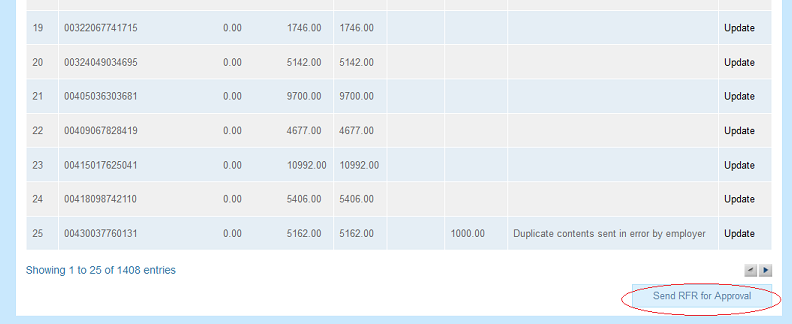
- Click on 'Send RFR for Approval button to send the RFR to Employer (Checker)
- Once Employer (Checker) approves the RFR request, the same will be forwarded to Customer Bank
- Customer Bank forwards the RFR to Central Bank
- Central Bank, subject to the status of pay out will instruct Agent to refund the money
Track RFR file status
- Go to Employer home screen
- Click the link REQUEST FOR REFUND
- Select a month in the dropdown
- All the RFR SIF files will be displayed with status and Bank Status
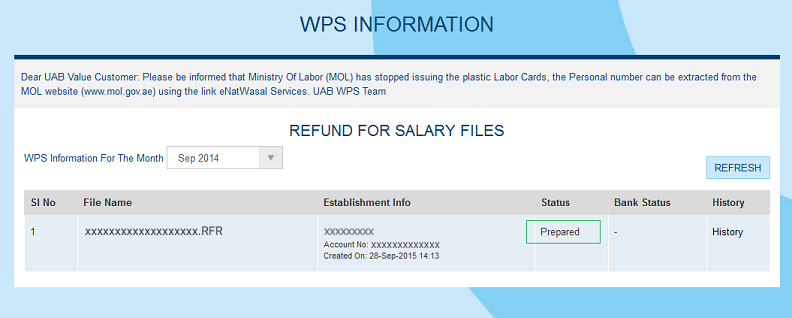
- Click on the hyper link enabled for the RFR file to view the file details
- Status of the RFR file and action taken by Bank will be displayed
- Status – Prepared represents a RFR SIF file which is prepared by Employer (Maker)
- Status – Approved represents a RFR SIF file which is approved by Employer (Maker)
- Status – Rejected represents a RFR SIF file which is rejected by Employer (Maker)
- Bank Status – ACK represents a RFR file which is approved by Central Bank
Review of SIF and RFR by Checker
- All the SIF/RFR files prepared and submitted by Employer (Maker) will be pending with Checker for review
- Checker can view the list of SIF and RFR files at Checker WPS Information page
- All the SIF files will be shown when click on 'SALARY FILE' in home page. To view RFR files to be reviewed, click on the link 'REFUND FILE' in home page
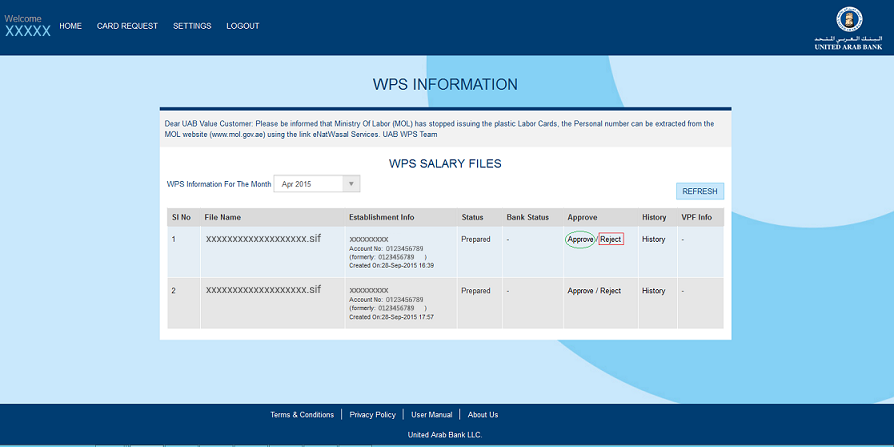
- To view the file details, Checker will click on the hyper link enabled for the SIF or RFR file
- To approve a file, click on the “Approve” link , so that a prompt box will be opened as shown in the figure
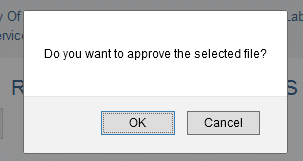
- Click on OK to confirm the Approve action and a new screen will be displayed with selected details in SIF file
- otherwise click on Cancel to cancel the action
- To reject a file, click on the “Reject” link
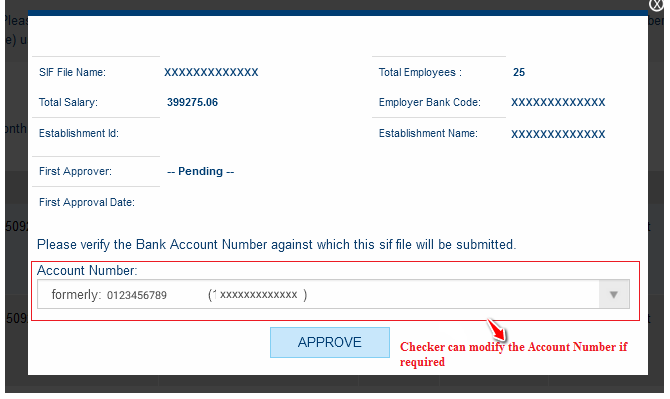
- While approving the SIF file, Checker can swap the Account Number
- Click on Approve button and the SIF file will be forwarded to Customer Bank
Manage Employee Information
- Go to Employer home
- Click on “Employee info” link
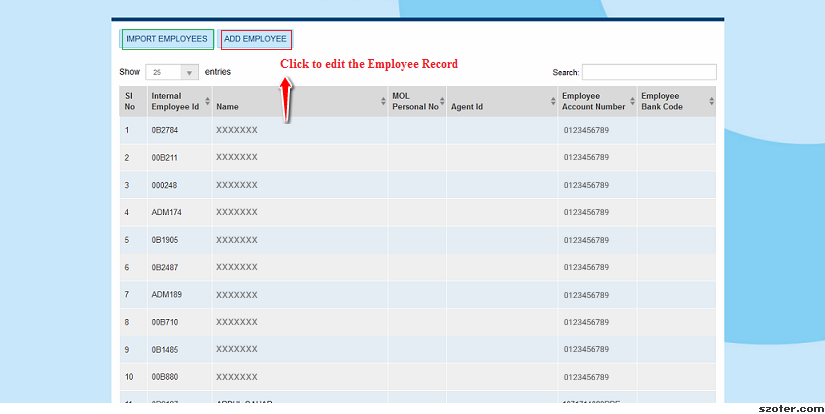
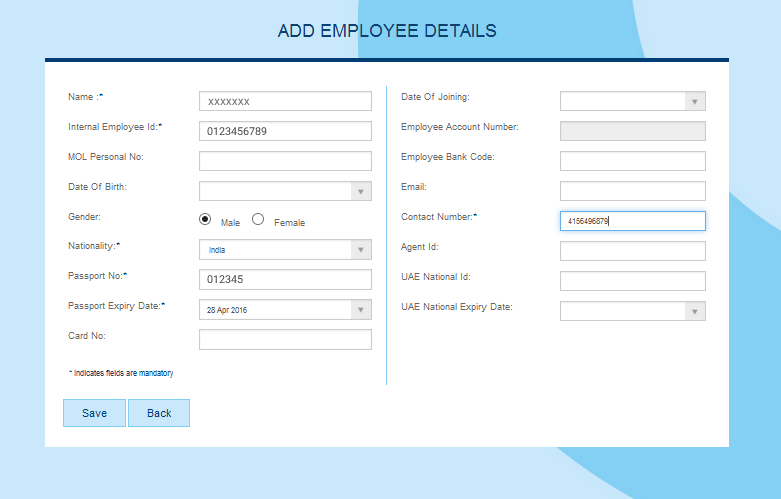
- Employer can either import employee information or Add Employee records, one by one
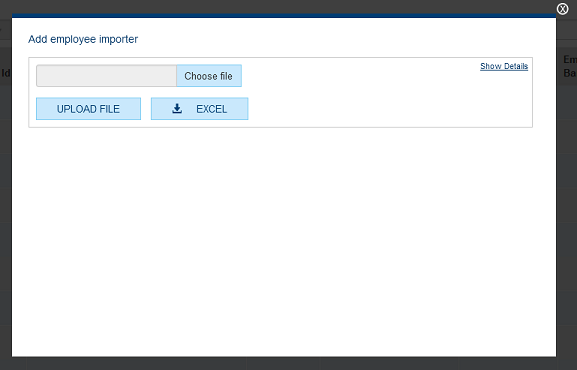
- Click on IMPORT EMPLOYEES button to import employee information from an Excel file
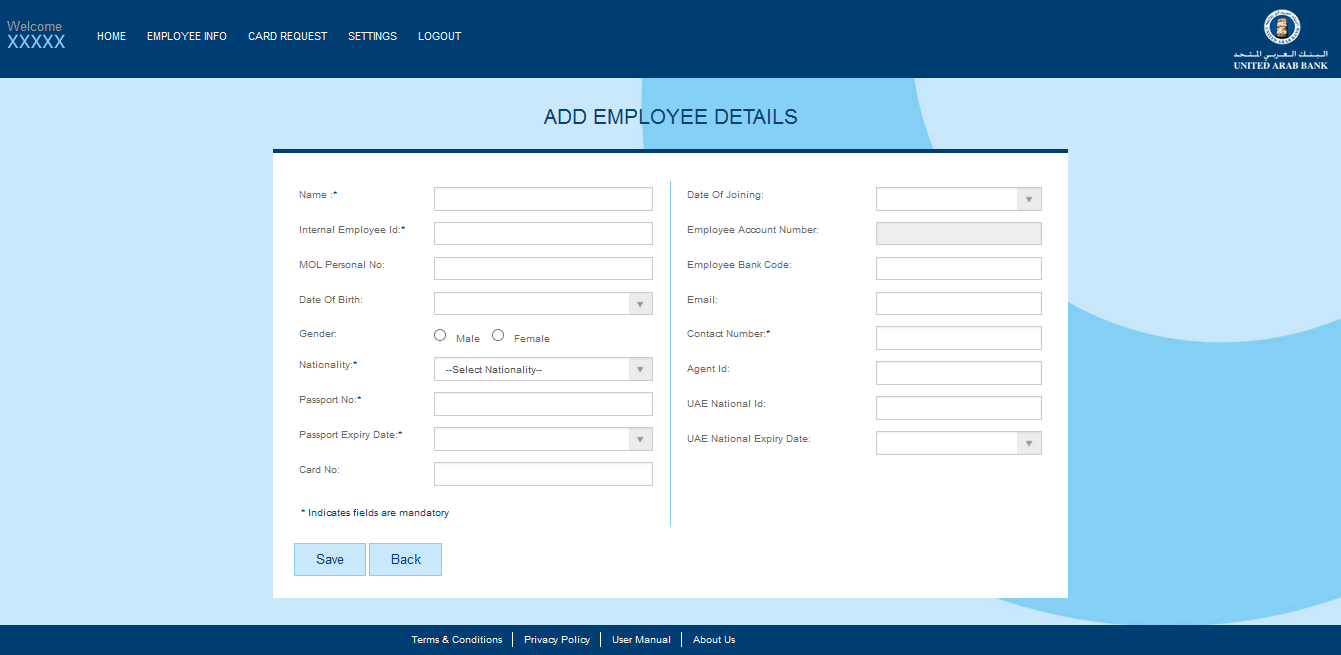
- Click on ADD EMPLOYEE button to add employee information
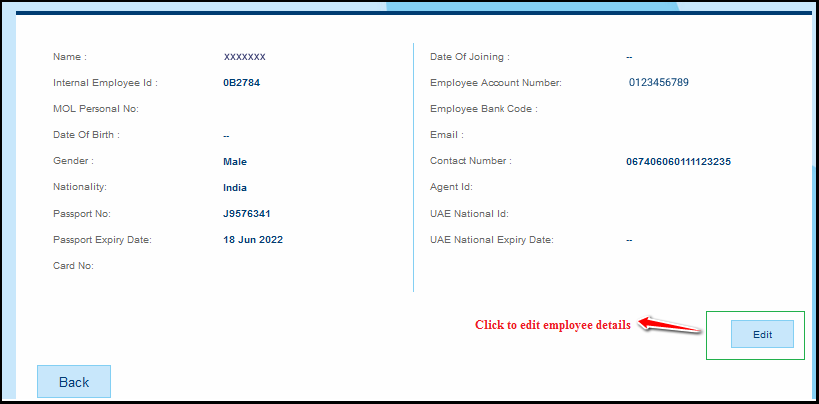
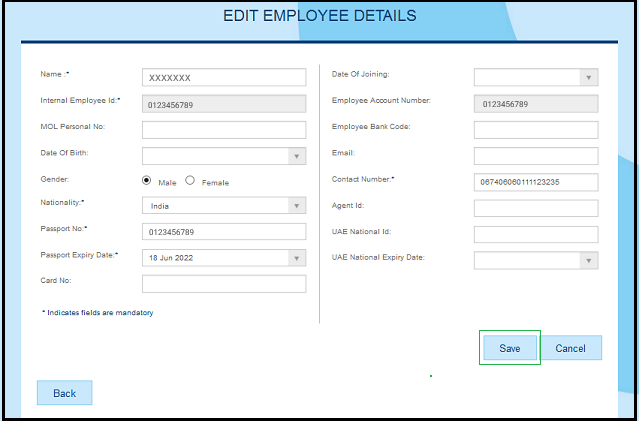
- The below screen will be displayed when click on Employee Name to edit the employee details
- Click on EDIT button to edit the employee details.
- Edit the details and click SAVE.
Upload NON WPS File
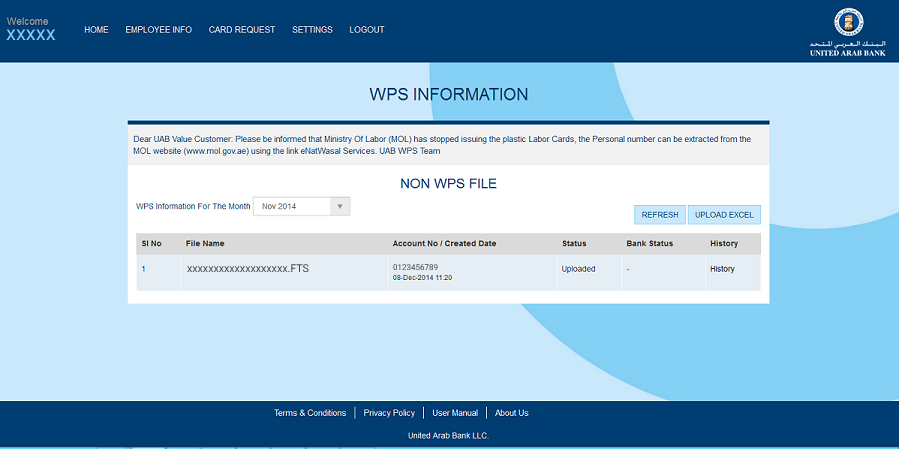
- Go to Employer home " PAYROLL SYSTEM" screen
- Click on “NON WPS FILE” link
- Select a month in the drop down, so that NON WPS information for the month will be displayed
- All the NON WPS files uploaded for the selected month with file details, status, bank status and history will be displayed
Upload GPSSA Pension File
- Go to Employer home " PAYROLL SYSTEM" screen
- Click on “GPSSA PENSION FILE” link
- Select a month in the drop down, so that GPSSA Pension File information for the month will be displayed
- All the GPSSA PENSION files uploaded for the selected month with file details,Customer status, bank status and history will be displayed
Card Request
- Go to Employer home " PAYROLL SYSTEM" screen
- Click on “Card Request” link
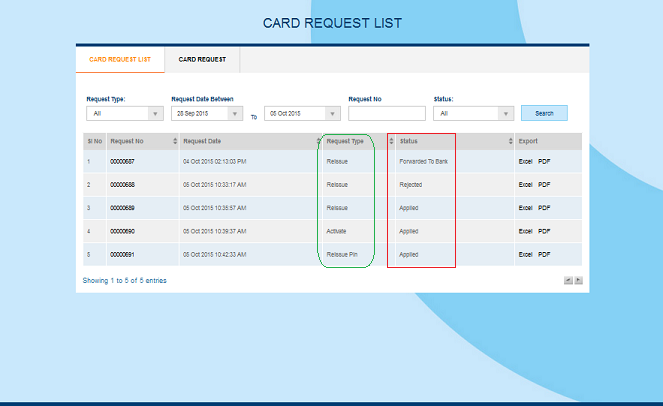
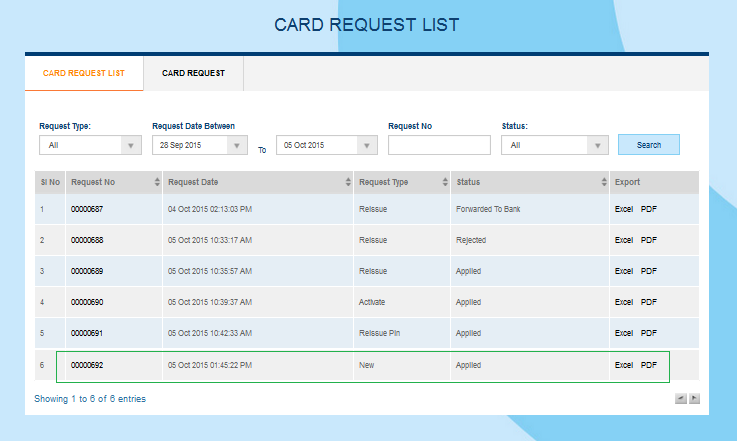
- Select the request criteria(date range/request No/status) from the screen and click on 'SEARCH' button.
- All the card requests for the selected search criteria will be displayed in the CARD REQUEST LIST tab.
- Add a new employee to the system. Refer Manage Employee Information
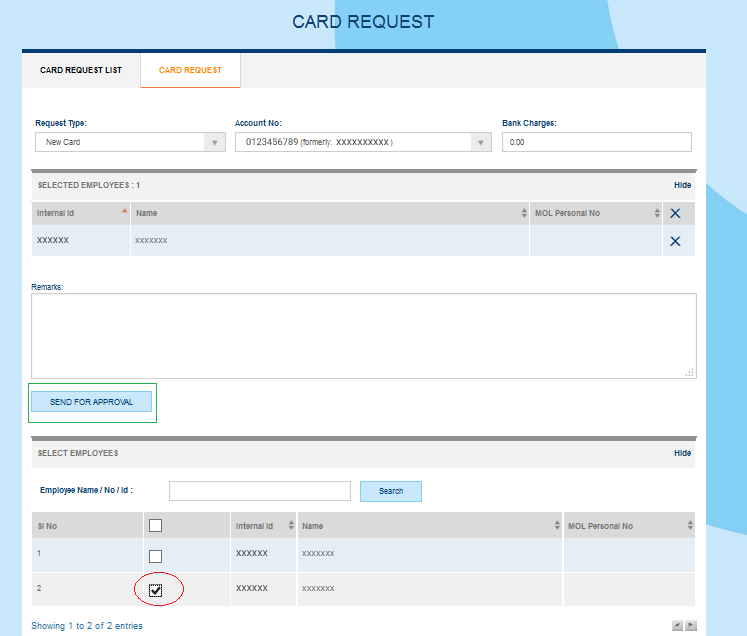
- To raise request for a new card go to "CARD REQUEST" tab, select request type as 'New Card' from drop down and select Account Number.
- Employee list will be displayed and select the employee for whom salary card request to be raised and click 'SEND FOR APPROVAL' button.
- The new card request will be listed in REQUEST LIST tab and the status will be 'Applied'.
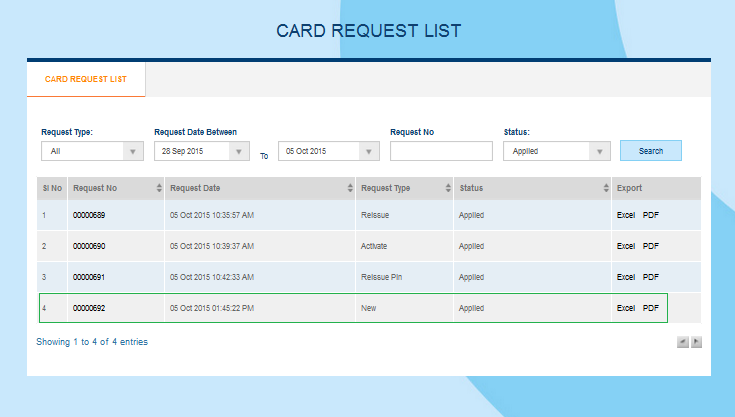
- Login as Authorizer and see the request in RequestList tab with request type 'New' and status 'Applied'.
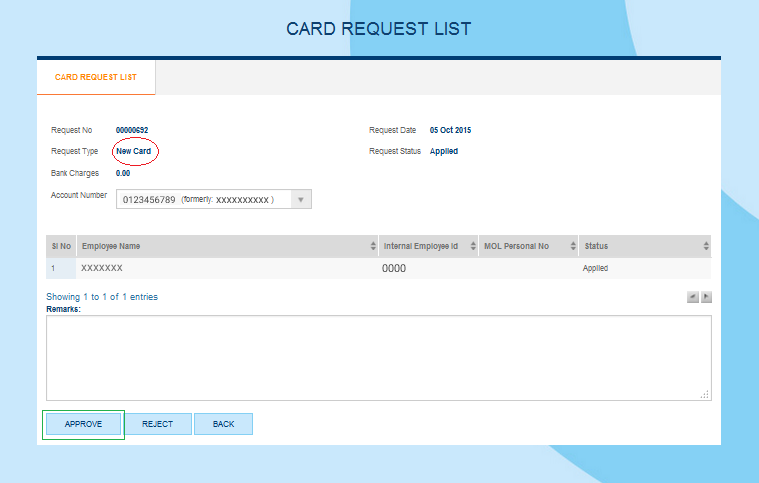
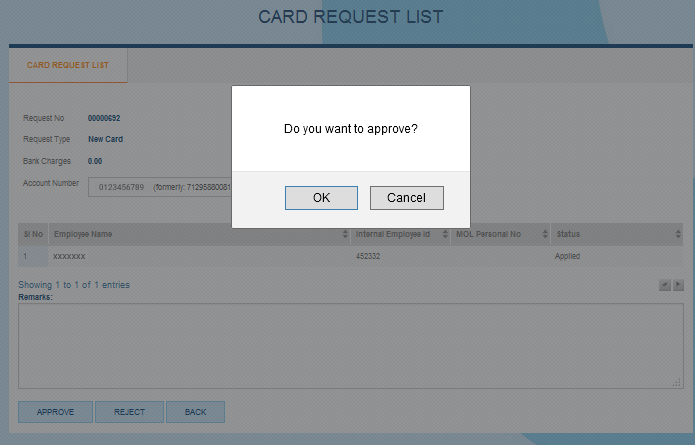
- Click the request to see the approve/reject screen.
- On Click of 'APPROVE' a prompt will be shown and click 'OK' to approve the request
- The request will be forwarded to bank and request status will be 'Forwarded to Bank'.
- If the Authorizer rejects the request then the status will be 'Rejected'.
- Bank validates and approves the New Card request and dispatches the card
- If the Bank rejects the card then the status will be 'Bank Rejected'
- User can export the request to excel/pdf using 'EXCEL/PDF' link against each request in the 'CARD REQUEST LIST tab.
New Card: This option will be used to send a request for a New card
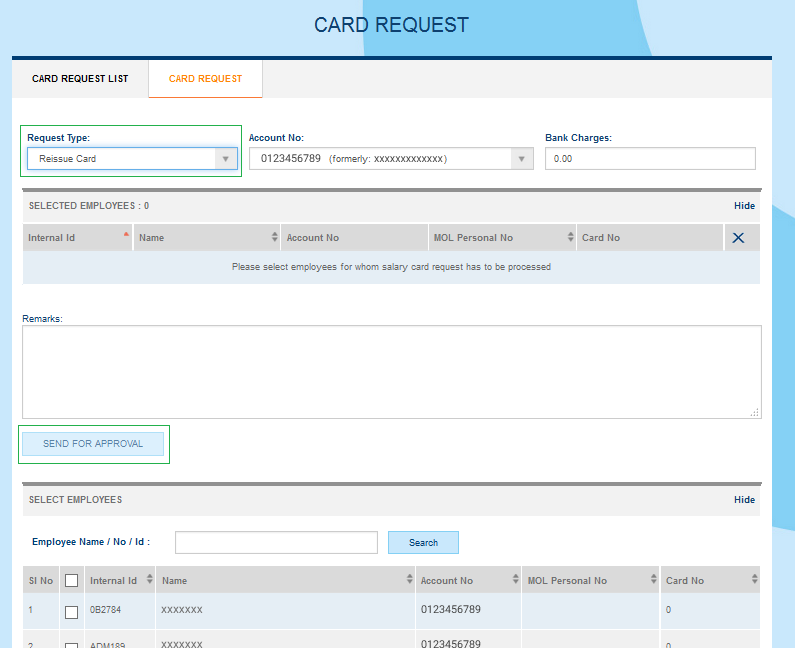
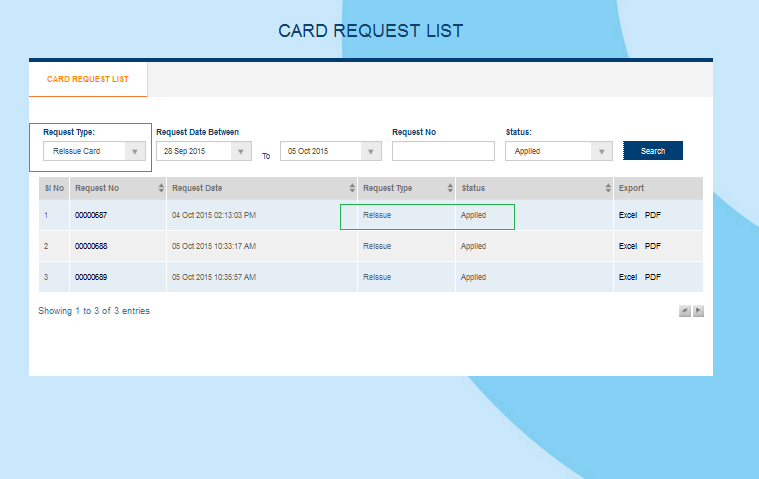
- To raise request to reissue card go to "CARD REQUEST" tab, select request type as 'Reissue Card' from drop down and select Account Number.
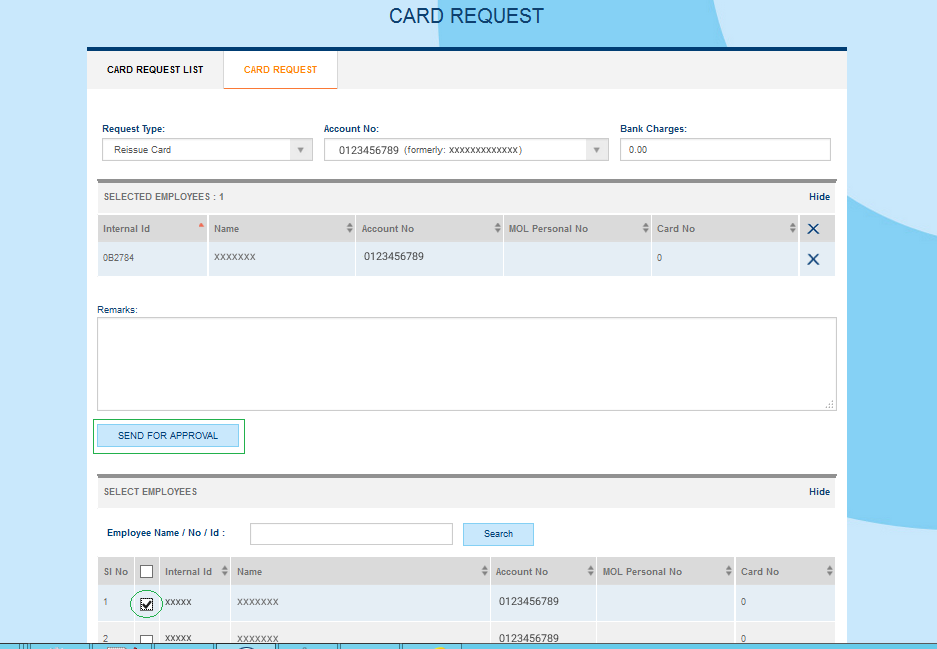
- Employee list will be displayed and select the employee for whom reissue card request to be raised and click 'SEND FOR APPROVAL' button.
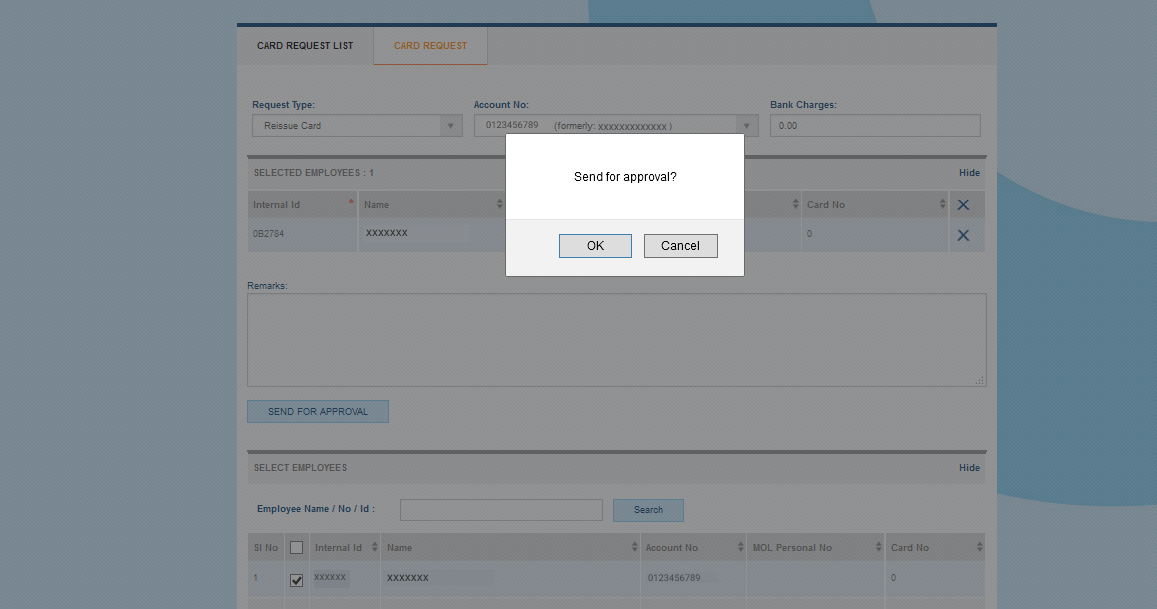
- A prompt box will be shown as below.Click 'OK' to send the request
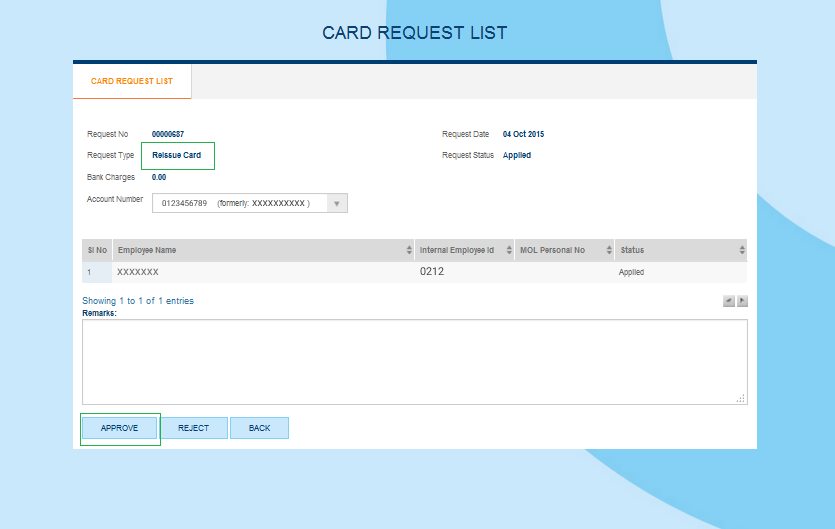
- Login as Authorizer and see the request in RequestList tab with request type 'Reissue' and status 'Applied'.
- Click the request to see the approve/reject screen.
- On Click of 'APPROVE' a prompt will be shown and click 'OK' to approve the request
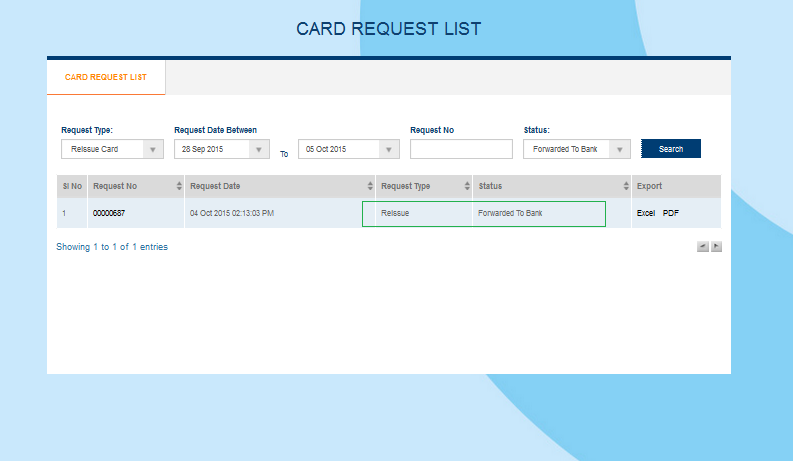
- Approved request will be forwarded to Bank for further process
- The request will be listed in REQUEST LIST tab with status 'Forwarded to Bank
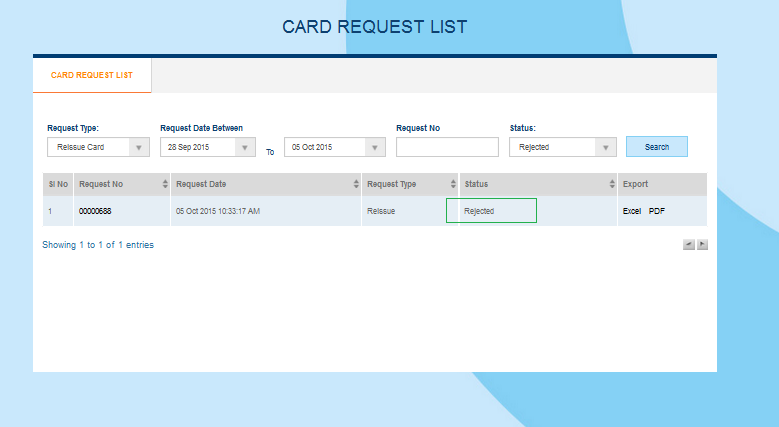
- Rejected request will be listed in REQUEST LIST tab with status 'Rejected'
Reissue Card: This option will be used to send a request to Reissue a card

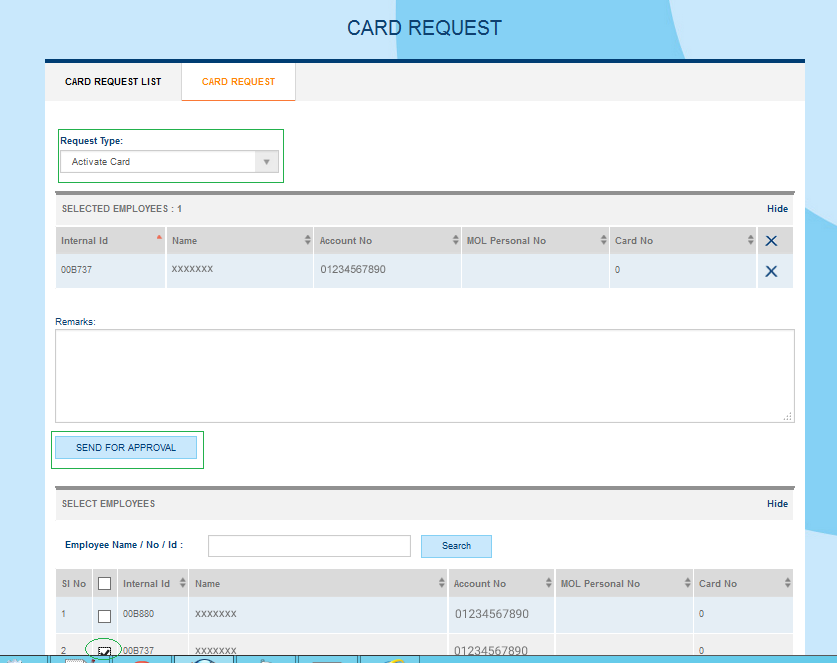
- Activate Card: This option will be used to send a request to Activate the new card issued
- To raise request to activate card go to "CARD REQUEST" tab, select request type as 'Activate Card' from drop down and select Account Number.
- Employee list will be displayed and select the employee for whom activate card request to be raised and click 'SEND FOR APPROVAL' button.
- Login as Authorizer and see the request in RequestList tab with request type 'Activate Card' and status 'Applied'.
- Authorizer approves the request and forward to Bank for further process.
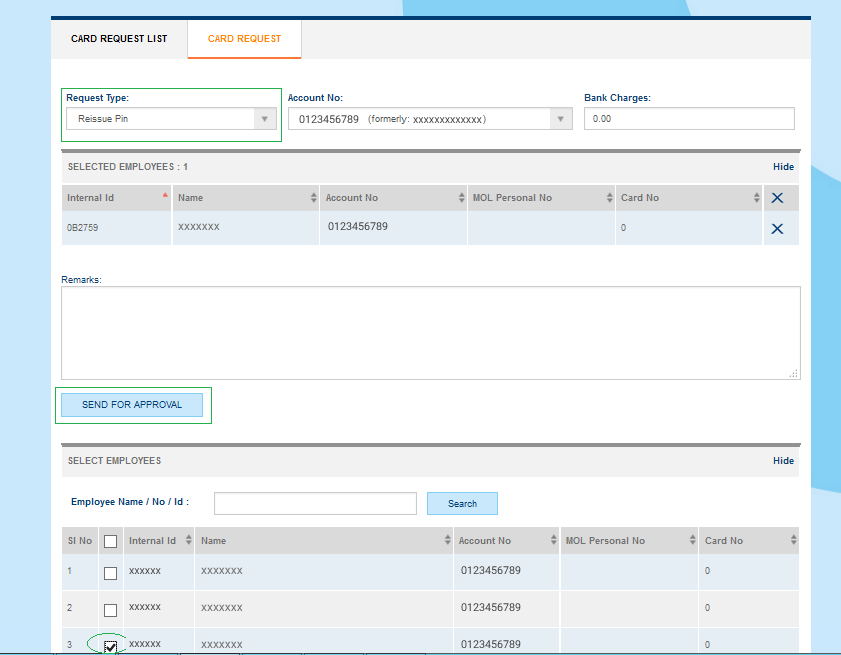
- Reissue Pin: This option will be used to send a request to release a card blocked after wrong PIN input more than 3 times
- To raise request to reissue pin go to "CARD REQUEST" tab, select request type as 'Reissue Pin' from drop down and select Account Number.
- Employee list will be displayed and select the employee for whom reissue pin request to be raised and click 'SEND FOR APPROVAL' button.
- Authorizer approves the request and forward to Bank for further process
- Login as Authorizer and see the request in RequestList tab with request type 'Reissue Pin' and status 'Applied'.
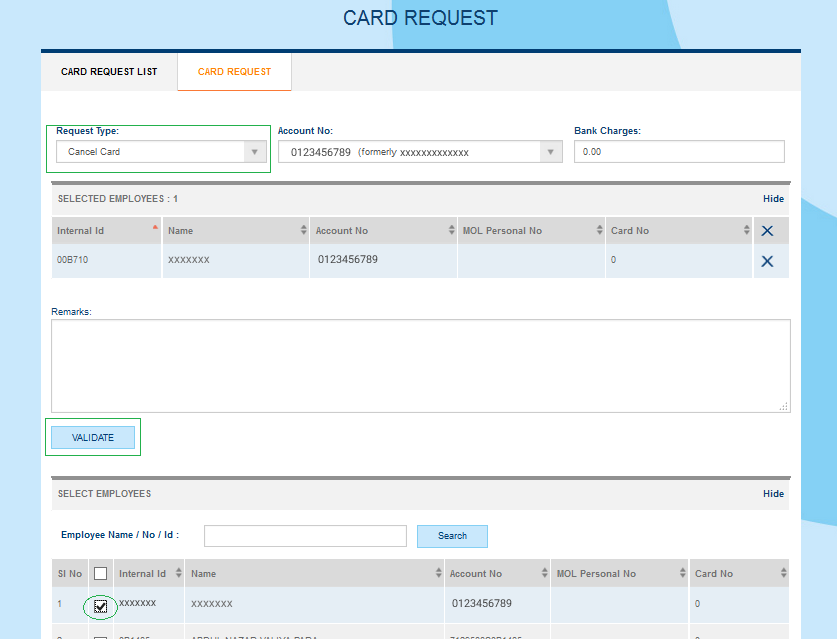
- Cancel Card: This option will be used to send a request to Cancel the card issued for an employee
- To raise request to cancel card go to "CARD REQUEST" tab, select request type as 'Cancel Card' from drop down and select Account Number.
- Employee list will be displayed and select the employee for whom cancel card request to be raised and click 'SEND FOR APPROVAL' button.
- Click 'VALIDATE' button to validate the request
- Login as Authorizer and see the request in RequestList tab with request type 'Cancel Card' and status 'Applied'.
- Authorizer approves the valid request and forward to Bank for further process.
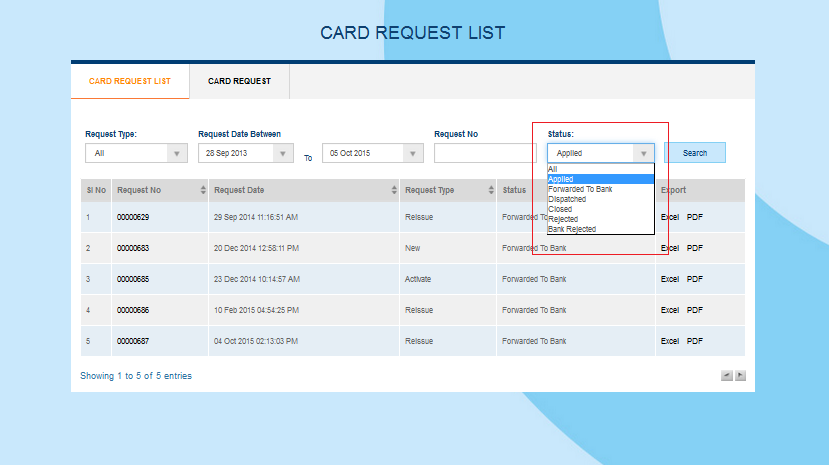
- ‘Applied’ status will be displayed for all the requests send for Authorizer approval.
- ‘Forwarded to Bank’ status will be displayed for the requests approved by Authorizer.
- ‘Rejected’ status will be displayed for the requests rejected by Authorizer.
- ‘Bank Rejected’ status will be displayed for the requests rejected by Bank.
- ‘Dispatched’ status will be displayed for the requests approved by Bank and dispatched the card/pin.
- ‘Closed’ status will be displayed for the closed requests.
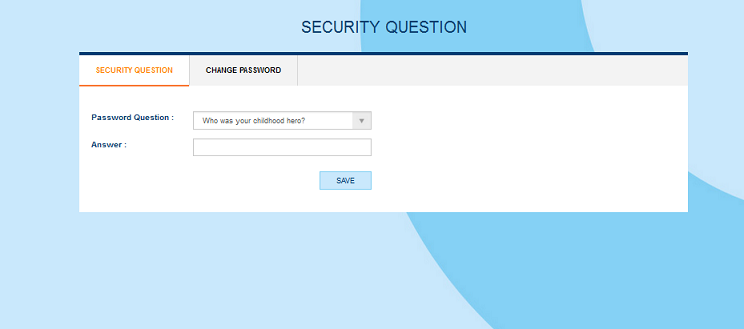
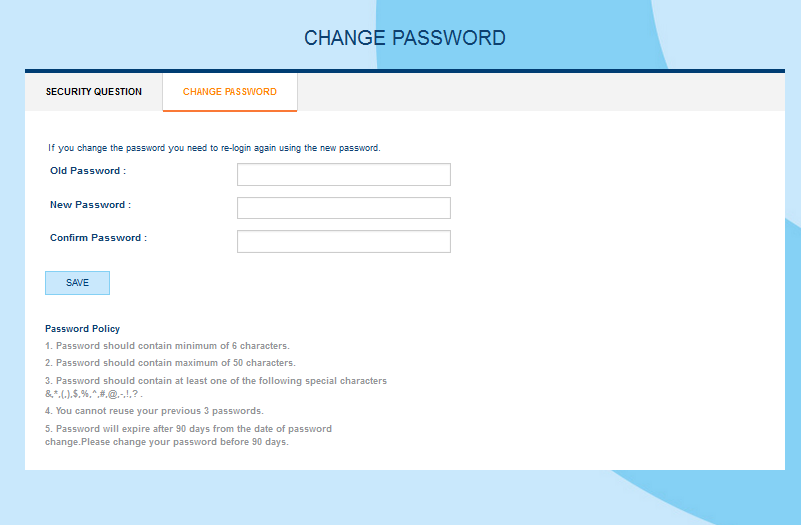
Set Security Question/Change Password
- Click the link SETTINGS in the employer home page
- User can set a security question to login if password is forgotten.
- User can change password using 'Change password' screen
Forced Change Password
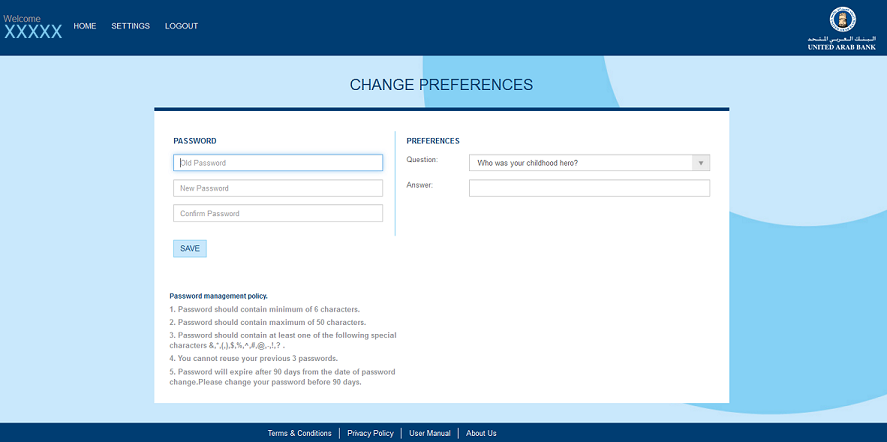
- Newly created users will be redirected to 'CHANGE PREFERENCES' screen when login to the system for the first time.
- User can change the default password set by administrator and set preferences using this screen.
Maker & Checker
- Gyre System enables 2 distinct roles - Maker and Checker for an Employer.
- Maker can act as the preparer or initiator and Checker as Approver
- System allows Maker to Upload SIF files, Generate SIF files, Create RFR requests and forward it to Checker for Approval
- Checker can see the SIF details, modify Establishment ID, Swap Employer Bank Account and either Approve or Reject the SIF file
- Checker can see the RFR details and either Approve or Reject the RFR file
- Once Checker approves the SIF file or RFR file, respective Customer Bank receives the files forwarded
RFR File Format
A RFR file contains request for refund information of some or all employees for a given SIF file.
Record Types
RFR file contain two types of records.
- FDR – one record per employee
- FCR – summary record for the entire file
The records consist of comma separated values.
FDR Fields
| Sl No | Field | Width | Type | Mandatory | Description |
|---|---|---|---|---|---|
| 01 | Record Type | 3 | A | Yes | Must be "FDR" |
| 02 | SIF File Name | 50 | AN | Yes | The name of SIF File sent to the bank |
| 03 | ACK File Name | 50 | AN | Yes | The name of the ACK file for the above SIF File |
| 04 | Agent Routing Code | 9 | N | Yes | Bank routing code of the agent |
| 05 | Employee ID | 14 | AN | Yes | Unique Employee Id issued by the MOL |
| 06 | Refund Amount | 15 | N | No | Amount of refund claimed |
| 07 | Refund Request Code | 3 | N | Yes | The 3 digit refund request code. For example, "001" |
| 08 | Employee Account Number | 16 | AN | Yes | Employee Account No with the agent |
| 09 | Future1 | 1 | A | Yes | Reserved for future use. Must always be " " |
| 10 | Future2 | 5 | A | Yes | Reserved for future use. Must always be "EWPMS" |
FCR Fields
| Sl No | Field | Width | Type | Mandatory | Description |
|---|---|---|---|---|---|
| 01 | Record Type | 3 | A | Yes | Must be "FCR" |
| 02 | Employer ID | 13 | N | Yes | Unique Employer ID issued by MOL |
| 03 | Employer Reference | 35 | AN | No | Documentary field for reference use. For example, may contain employer name. |
| 04 | Bank Routing Code | 9 | N | Yes | Routing Code of the bank of employer to which refund amount is to be credited. |
| 05 | Employer Account No | 20 | AN | Yes | Bank account of employer to which refund amount is to be credited. |
| 06 | Total Refund Claimed | 15 | N | Yes | Total refund amount claimed for all FDR records |
| 07 | FDR Count | 10 | N | Yes | Total number of FDR records in this RFR file |
| 08 | FUTURE1 | 1 | A | Yes | Reserved for future use. Must always be " " |
| 09 | FUTURE2 | 1 | A | Yes | Reserved for future use. Must always be " " |
| 10 | FUTURE3 | 5 | A | Yes | Reserved for future use. Must always be "EWPMS" |
SIF File Format
A SIF file contains salary information of employees for a certain month.
Record Types
SIF file contain two types of records.
- EDR – one record per employee
- SCR – summary record for the entire file
The records consist of comma separated values.
EDR fields
| Sl No | Field | Width | Type | Mandatory | Description |
|---|---|---|---|---|---|
| 01 | Record Type | 3 | A | Yes | Must be "EDR" |
| 02 | Employee ID | 14 | AN | Yes | Unique employee ID issued by MOL |
| 03 | Agent’s Routing Code | 9 | N | Yes | Bank routing code of the Agent |
| 04 | Bank Account No | 16 | AN | Yes | Bank account number of the employee |
| 05 | Pay Start Date | 10 | D | Yes | Payment start date |
| 06 | Pay End Date | 10 | D | Yes | Payment end date |
| 07 | Day in Period | 4 | N | Yes | Days in the period |
| 08 | Fixed Income | 15 | N | Yes | Fixed income paid to the employee |
| 09 | Variable Income | 15 | N | Yes | Variable income paid to the employee |
| 10 | Loss of Pay Days | 4 | N | Yes | Days of leave without pay for which loss of pay has been deducted |
SCR Fields
| Sl No | Field | Width | Type | Mandatory | Description |
|---|---|---|---|---|---|
| 01 | Record Type | 3 | A | Yes | Must be "SCR" |
| 02 | Employer ID | 13 | N | Yes | Unique establishment ID issued by MOL |
| 03 | Bank Routing Code | 9 | N | Yes | Bank routing code of bank from which salary is being disbursed |
| 04 | File Creation Date | 10 | D | Yes | Date of file creation in YYYY-MM-DD format |
| 05 | File Creation Time | 4 | N | Yes | Time of file creation in HHMM format |
| 06 | Salary Month | 6 | N | Yes | Salary month for which salary is being paid in MMYYYY format |
| 07 | EDR Count | 10 | N | Yes | Total employee count (number of records) in this SIF file |
| 08 | Total Salary | 15 | N | Yes | Total of all fixed and variable salary of all records in this SIF file |
| 09 | Payment Currency | 3 | A | Yes | Currency should always be "AED" |
| 10 | Employer Reference | 35 | AN | No | A documentary field for storing reference information pertaining to employer |
The Wage Protection System
The Ministry of Labour (MOL) has introduced the Wage Protection System (WPS) and requires all organizations to transfer employee salaries through the WPS.Employers are required to submit (Salary Information Files) SIF files containing salary information of employees to their bank for disbursement.If wrong or duplicate salary information is sent out, you can claim for refund using the Request For Refund File (RFR).The Ministry of Labour has more information related to WPS on its website.
Additional Resources
MOL - Wage Protection System Guidelines
Go to topView Annotated NACK report
- NACK means Salary information file which is ‘Not Acknowledged’ by Central Bank.

- Click on the hyper link enabled for the SIF file with NACK status to view the details in the SIF file
- In the SIF file details screen, select the Employee filter as Employees with NAK
- All employees with NAK status will be displayed
- Employer can down load the data as SIF file or as an Excel file
- To view the history of NACK file, click on the history link